Monday, March 12, 2007

Epiphone Valve Jr: adding an 8 ohm output

I only found hints and brief mentions about modding a Valve Jr combo for 8 ohm output. So here's a step by step.

Disclaimer: Tube amplifiers are dangerous. It's quite possible that a lethal voltage remains in the capacitors for weeks. Don't do this if you don't know anything about amps.

Ok, got that out of the way. So the output transformer in the combo version looks like this:


The 4 ohm output to the internal speaker is wired to the brown and black wires. To add an 8 ohm output all you have to do is stick in a jack that's wired to the red and black wires. That's it!


That's what the standard jack is wired to. Note the red wire that isn't connected to anything. Epi was nice and left plenty of wire so anyone could use it if they wanted to.

Here's what I recommend:

  1. Install a 1/4" jack in the back of the amp close enough to the 4 ohm output that the red wire will reach it.
  2. Solder the red wire to one terminal.
  3. Cut the black wire in two. Strip both ends of the cut.
  4. Run a heavy gauge (18 AWG speaker wire should be fine) wire from the free terminal on the jack to both ends of the black wire. Twist all three conductors together and solder.
  5. Put some electrical tape over any exposed conductor and box that bad boy back up.

That's all there is to it. You can test it by running the 4 ohm internal speaker briefly using the 8 ohm output. Now you can drive an 8 ohm cabinet for when you need a bit more oomph.

Labels:

Friday, March 09, 2007

DIY bottleneck slide

Intro

Slides are cheap, but finding one you like isn't easy. Here's one method to make your own from a wine bottle.


DISCLAIMER: You'll be using power tools and glass in this project. Eye protection is mandatory. Gloves are recommended. A dust mask is required when you're using the dremel tool on the glass. If you chop off a lung while doing this it is not my fault.

Find a Bottle

The thicker the glass the more sustain you'll get from it, but mainly just find something you like and fits your finger as close as possible. The neck needs to be straight so it fits your guitar neck profile (which for slide purposes is mostly flat). Angled is ok, but flared is bad.

For this demo we'll be showing a Yellow Tail 2005 Shiraz, a very good year for $8 wine. This was too big for my pinky but I made it for a friend.


Note: I've only had success with this method with blue and green glass. They're harder than clear glass and that probably has something to do with it. The clear glass always cracks in a bad way.

Tape it up

You don't want to scratch any of the sides of the neck so tape it up with masking tape or whatever.


It's personal preference how long the slide is. Most bottlenecks are straight for just about the right length. The blue slide shown at the end is 2.25" in length and is just right for me. Having a slide shorter than the width of your neck isn't a huge handicap since you rarely play all 6 strings at once.

Score the cutting lines

This helps get a really straight line when we go to the dremel tool in the next step. I use a triangle file but any file with a sharp edge will do.


Say hello to my little friend


Ok, whip out that dremel tool. You want the big cutting disc (I think it's 1.5" in diameter). Start on the tip of the bottle and go round and round, following your scored line. Start with the slow dremel speed. Once you get a good cut in there, kick it into high gear but keep going around the bottle. The glass will turn red-hot where you're cutting and eventually the lip of the bottle will pop off.


Repeat for the body-end cut. This is more touchy and is where you're most likely to have a devestating crack.


There's a possibility that either cut will break in a bad way. That's ok because you can always find another wine bottle and you only spent about 10 minutes so far doing this. See the end for the reliable, slow way to do this.

Finish it up

It's unlikely that you'll get a clean break. Even if you do you want to file the ends smooth enough you won't cut yourself and that it's comfortable. Your tools are files, sandpaper, and the buffing wheel of your dremel tool.

The palm-end of the slide doesn't need to be too smooth but the tip-end does. The tip should be rounded off so that you can use it on single strings and so it doesn't catch on neighboring strings. Note the rounded tip (on the right side of the picture):

Making it comfortable

The last thing I do is take some adhesive velcro tape and cut some of the fuzzy side up and use it to make a cushion inside. This helps it to fit better. If the bottle diameter happens to fit your finger very well then you don't need this.


You can also round the spot where your finger sits on the palm-side of the bottle. You can see this in the below picture.


The slow way

If you've got a lot of patience you can keep the dremel in slow speed the entire time and actually just grind away the glass until you cut thru it all the way. This will give you a nice clean break... but it will take many hours, especially with blue glass. I've done it. It wasn't worth it. Just grab a few bottles and keep trying till you find one that works. I'm 2/2 with the blue glass, but it's hard to find.

Labels: ,

Tuesday, January 30, 2007

Acoustic archtop modification - adding a pickup

In this post I'm documenting my addition of an electric pickup to an old (50's era) acoustic archtop guitar. You don't see a lot of acoustic archtops these days. Flat tops are much more popular. Archtops have some characteristics that make them unsuitable for some kinds of acoustic music but they have one advantage: the only difference between an acoustic archtop (often referred to as a "jazz" guitar) and a hollowbody electric guitar is the pickup.

The Guitar

My project guitar is a 1959 Harmony H950 "Monterey Leader" archtop guitar. It's a mid-size archtop with the body made entirely from solid birch. It's not a perfect specimen; if it were I wouldn't want to mess with it. But there's enough dings and scratches that putting some holes in it won't lower the value of the guitar much. I paid $150 for this guitar on ebay.


The Pickup

As much of a beater as this instrument is I still don't want to do anything major to it. So cutting a big slot in the top to mount a pickup isn't going to happen. This rules out standard pickups because of the tight clearance between the strings and the top. But a couple companies make humbucker pickups meant to be attached to the fingerboard of an archtop. I found one on ebay for $15.

One problem with this pickup is that even though the manufacturer lists it as 3/8" thick the cabling comes out of the back of the pickup (towards the body). This adds to the clearance needed between the strings and the body considerably. Initially the treble strings contacted the pickup when fretted past the 15th fret. Also the pickup was angled such that the treble strings made a much stronger signal than the bass strings, which sounded unbalanced. I was able to cut some of the insulation off of the cable enough to take care of the fretting problem and most of the balancing problem.

The pickup brings out 4 conductors which allow for coil splitting but I found the regular humbucking wiring configuration sounded best.

The Pickguard

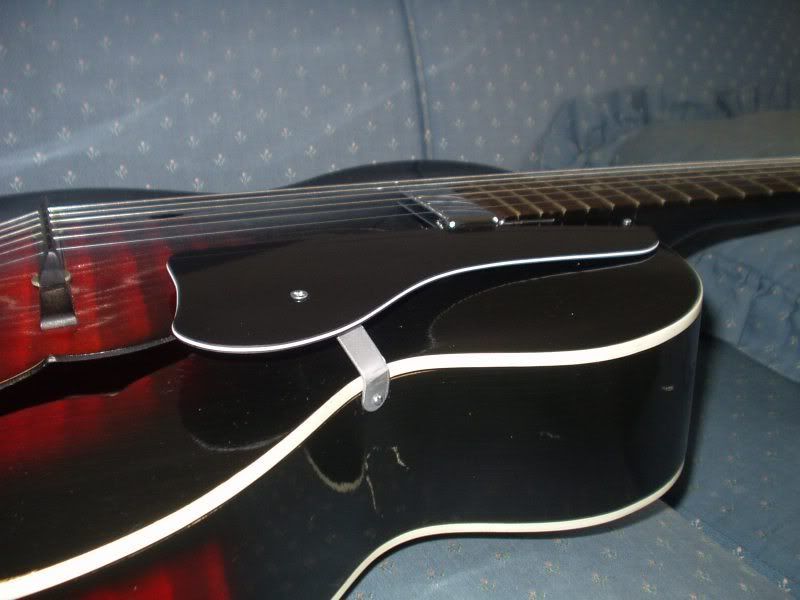
Next a pickguard was needed to hide the wiring and output jack. My guitar didn't have the original pickguard when I bought it. This is common because the guards were often made from celluloid which deteriorates over time. So I bought some 3-ply plastic from Stew-Mac and drew up a pattern.


My buddy routed that out on his router table and you can see it turned out well.

Tone & volume controls

My initial plan was to install tone and volume pots on the pickguard. The only spot with enough clearance for the pots is on the large bulgy area. It seemed like that would get in the way of strumming. I hooked up an external .02uF/500k tone control just to see what kind of difference it would make and it didn't seem to make that much difference. In the end I decided to leave it without controls.

Pictures

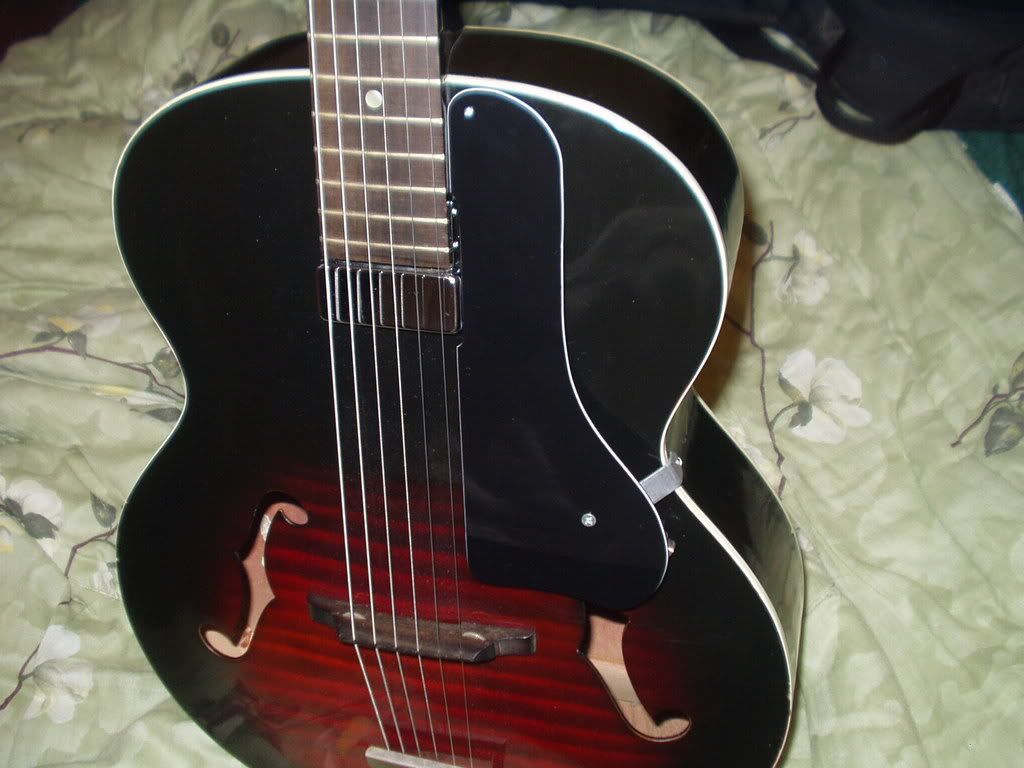
With the pickup and pickguard mounted.


And after the wiring is finished. Note the jack tip on the lower right corner of pickguard.


Sound Samples

These were all played into an Epiphone Valve Jr combo amp and recorded with an inexpensive vocal mic.

Sunday, January 07, 2007

DIY guitar amp attenuator

I got a new Valve Jr. combo amp for Christmas and it turns out that 5W is really way too loud for my ears and probably won't make me popular in the neighboring apartments. I saw mention of a "radio shack attenuator" here and there and eventually went and picked up one of these:

That's an in-wall volume control from Radio Shack, part number 40-993. They go for $18. Inside is an autotransformer with a primary coil that measures 5.3 Ohms and a secondary that is variable from 5.3 Ohms down to 0. It's rated at 25 watts so it should be fine for a 5 watt amp.

Disclaimer

I am not an expert with guitar amps or analog electronics. I have only basic knowledge of electrical concepts. Using the below design with different impedance or higher wattage amps may damage your amp or start a fire. There's a finite possibility that I have made a mistake and this will even damage the amp it is designed for (the Epiphone Valve Jr. combo w/ 4 Ohm speaker). Use this information at your own risk.

Analysis

Ok, so the first thing I did was just insert this between the speaker and the amp's output. This works and sounds fine. But 5.3 Ohms is a bit higher than the 4 Ohm load the amp is expecting. Adding a 20 Ohm resistor in parallel with the primary winding brings that down to close to 4 Ohms. Here's a schematic.

R4 should be a big power resistor. I chose two 10 Ohm, 10 watt resistors connected in series. You may be able to get away with a 20 Ohm, 10 watt resistor but be careful.

I ran a SPICE sim to see what the input impedance for this circuit is.


Dividing those two we see it's right about 4.3 Ohms. Close enough. This is really a guess since the inductance of this transformer isn't known to me.

Construction

These transformers drop right into the wall breakout boxes you would put a light switch in. There's enough room inside for a couple jacks and the power resistors. When you're done you have the attractive white and gray enclosure shown below.

Ok, it's ugly but it works. And for $25 it sounds pretty good.

Sound Sample

I recorded this with a computer headset at very low volumes in my bedroom. I didn't alter the volumes of the samples with anything other than the attenuator.

To hear the sound clip click here. Apologies for my amateur playing.

Final Warnings

  1. It's unlikely this would be safe to use with anything but a 5 watt, 4 Ohm amplifier. My understanding is tube amps aren't forgiving when it comes to driving lower-than-expected loads. You could blow the amp's tranformer or anything else in there.

  2. Careful with the jacks. If you screw up and plug the speaker in where the amp should be and vice versa bad things could happen. The output side of this circuit has very little impedance when the attenuation is at its maximum. Make sure you label the input (from amp) and output (to speaker) clearly.

  3. Keep an eye on it. If it gets hot or you smell melting plastic you probably let the smoke out of something.

Thursday, April 20, 2006

Low-level Programming With Python Extensions

So, Python is a great malleable tool for building up all sorts of things. I use it mainly to build automated tests for a PCI device we're bringing up at work. While the device driver is straight C the tests that use it could be written in pretty much anything. Python is certainly a powerful tool that doesn't get in the way. And everything was groovy until I got around to testing a feature that requires specific structures in PC memory.

For the sake of discussion we'll assume that our device under test wants a pointer to some table structure in host memory and that table then points to several other structures. We write the address of that table to some register in the DUT and say "go." Nothing fancy. Now if we were writing this in C we'd be done by now (except that we prefer not to write these kinds of tests in C for all the usual reasons). In Python however it's not so simple; we can't make a simple struct, and if we could we wouldn't know its address.

After some head scratching you start to remember that it's possible to write extensions for Python in C. You also remembered you tried it once and it scared you. Well let's try it again. Now the simplest thing we could do would be to simply allocate a block of memory and make some functions that let us get at that memory.

Like so:

// A scratch memory module for Python.  Just allocates a block
// of memory and gives the user access to it and its address.

#include <python2.4/Python.h>

#define SCRATCH_SIZE 1024*10 // 10kB

int* scratch_mem_ptr;


PyObject *readw(self, args) PyObject *self, *args; {
PyObject *result = NULL;
int offset;
int val;

if (PyArg_ParseTuple(args, "i", &offset)) {
val = *(scratch_mem_ptr + offset);
result = Py_BuildValue("i", val);
}

return result;
}

PyObject *writew(self, args) PyObject *self, *args; {
PyObject *result = NULL;
int offset;
int val;

if (PyArg_ParseTuple(args, "ii", &offset, &val)) {
*(scratch_mem_ptr + offset) = val;
result = Py_BuildValue("");
}

return result;
}


PyObject *get_addr(self, args) PyObject *self, *args; {
PyObject *result = NULL;

if (PyArg_ParseTuple(args, "")) {
result = Py_BuildValue("i", scratch_mem_ptr);
}

return result;
}

PyMethodDef methods[] = {
{ "readw", readw, METH_VARARGS },
{ "writew", writew, METH_VARARGS },
{ "get_addr", get_addr, METH_VARARGS },
{ NULL, NULL },
};


void initscratchmem() {
(void)Py_InitModule("scratchmem", methods);

scratch_mem_ptr = malloc(SCRATCH_SIZE);
}
scratchmem.c


The above can be compiled like this (the "python2.4" should be swapped out above and below to match your Python version):
gcc -Wall -g -I/usr/include/python2.4/ -c scratchmem.c -o scratchmem.o
ld -shared scratchmem.o -o scratchmem.so

Now let's try it out. To do this you'll need that scratchmem.so to be in a directory Python knows to look in. The simplest is to have it in the current directory.
>>> import scratchmem
>>> hex(scratchmem.get_addr())
'0x81769c8'

Hey, not bad, not bad. Now, let's try to use that memory.
>>> for offset in range(4):
... scratchmem.writew(offset << 2, 0xffff0000 + offset)
...
>>> for offset in range(4):
... print hex(scratchmem.readw(offset << 2))
...
0xffff0000
0xffff0001
0xffff0002
0xffff0003

It works. We're geniuses and we can take the rest of the day off, right? Not quite. We did manage to give our Python programs access to some raw memory but we've knocked ourselves back into the stone ages because we now have to manage that entire block of memory ourselves. A better design would be to have little memory objects that the user can instantiate at will and of varying sizes. This will hopefully be the subject of a future post.

Another thing missing in this design is range checking. This will run amok in someone else's memory if the user gives an offset that overruns what we've malloc'ed, just like our regular C program would.

Saturday, February 11, 2006

A Threat Analysis of the Danish Empire

Introduction

Recent world events have brought the nation of Denmark to the forefront of geopolitical thought. In this paper we will seek to perform a thorough analysis of the threat Denmark poses to life as we know it.

Military History

Denmark is the oldest monarchy in Europe and has a long history of brutal military conquests including the invasion of London, Stockholm, and Copenhagen. For thousands of years the Danes have terrorized Europe. And yet the common man's conception of the Danish people revolves around sugar cookies, chocolate, and cheese. How can two such discontinuous views of Denmark coexist? The answer lies in Denmark's best kept secret: Danes are Vikings.

The Viking Overlords

Vikings dominated most of Europe for centuries; so much so that the period of 793 - 1066 A.D. was known as the "Viking Age." To put this in perspective, the Nazis were in power for about 12 years and didn't even get an era named after them. The Viking Age was followed immediately by the Middle Ages, which was considered an improvement by all involved (except maybe the Vikings).

Geographical Position


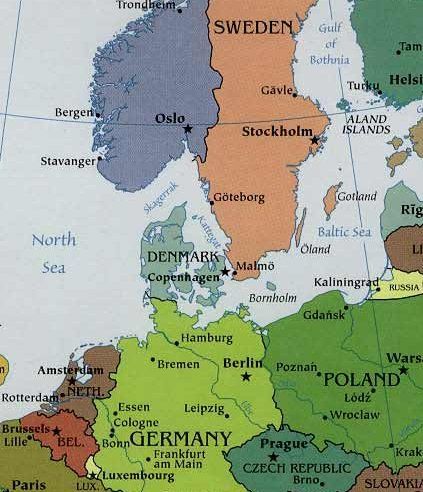
A quick glance at a map of Europe (show above) reveals peculiar property of Denmark: it's hard to find. We believe this probably lended the country some security in past centuries but modern technology negates this advantage today. Using this technology we were able to pinpoint the location of Denmark as shown in the next map.


So there it is, north of Germany, jutting out into the North Sea. We believe this is a good defensive position for these Viking aggressors as many would-be attackers will need to move thru southern Europe and all they way across Germany to get to Denmark. Chances are good that even the most vengeful enemy would be captivated by the foreign beauty of some waitress in a French or Italian cafe along the way and thus the attack would be repelled without any loss of Danish troops.

Military Power

Denmark's military numbers are unimpressive by most standards, around 25k standing troops, but when you consider that this number translates to about 1000 Viking longboats roaming about coastal land and waterways, pillaging and plundering, we believe you'll agree this is not an inconsequential threat. Also consider that in times as recent as the 20th century Denmark had a profitable and powerful empire reaching as far as the Americas.

Perceived Motives

Up until recently is was obvious to most military strategists that Denmark was vying to regain its former empire status but was unclear how it intended to do so. But recent events have shed some light on this. We believe their intent is to incite a large-scale war between European and Middle Eastern countries (primarily the region formerly known as Iran) and then conquer the victors in their weakness during the aftermath.

Conclusion, Forecast, and Recommendation

Our best case scenario is that Denmark continues to provoke the peace-loving, rational nations of our planet in an effort to drive energy costs high and morale low until peace talks eventually neutralize the situation. Our worst case scenario is best expressed as the following image:


Here you can see the demonic Viking hordes slaughtering our young men and riding off with our women. Later, the birds of the air feast on the bodies of the slain. It should be no mystery to the reader why we recommend the freedom-loving peoples of the world join together in against Denmark. We suggest using the phrase "War on Humor" to denote this effort.

Thursday, February 09, 2006

Proposal For Middle East Consolidation

Introduction


The U.S. is at war with Iraq. The way things are going the U.S. is also going to be at war with Iran. Assuming both wars are 100% successful there is an important opportunity that should be taken advantage of. Please refer to the map below.


Note the close proximity of Iraq to Iran. There is a high probability of future conflicts in this area and thus future military operations and media coverage. We propose that the two future U.S. territories, Iraq and Iran, be consolidated into one larger territory.

Phase I: Iranq


The consolidated territory consisting of the former Iran and Iraq countries will now be known as Iranq. The new map for this region is shown below.


Potential Benefits


The following is a short list of obvious benefits. This list is not exhaustive.

  • Less chance of Iranqi civilians being bombed due to misheard instructions.
  • Reduces the number of bumper stickers that overly-patriotic citizens need to put on their SUV's. We estimate this will save 230 billion tons of landfill space by the 2015.
  • Current and future President Bushes less likely to use the wrong name in press conferences.


Potential Problems


This plan is not without it's problems and risks. There is a risk that the upcoming war with Iran may have other world powers involved and much like WWII we end up with an East and West Iranq with a crumbly wall or large sand dune in between.

Another issue is the ethnic, political, and religious differences of the various peoples of the Middle East. However we believe that all groups will be able to put aside their differences once they fly the same flag and are ruled by the same unopposed, UN approved political party. The motto "one oil, one people" should be used to encourage this.

A third problem is apparent from closely studying the Middle East map. What's that little dot labeled Kuwait? We propose this be used for an Allied military base, it looks like the right size.

Phase II: Iranqistan


Once Iranq consolidation is complete it may prove equally useful to annex the neighboring country of Afghanistan. This will be an easier process since Afghanistan is already fully subdued by the U.S. military; indeed, it's merely a matter of printing new maps, like the one shown below.


One might ponder the reason for not taking Pakistan into this Phase II consolidation. After all, the name fits well enough. There are two key reasons for leaving Pakistan as it is. First, so far Pakistan hasn't done anything that would merit its swift and decisive military conquest. Wars aren't free and you need a plausible reason to start a new one in this day and age. Second, we believe there are tangible benefits to having a buffer country between Iranqistan and India. Fear not, there is preliminary research underway investigating the potential benefits of forming a Pakindia territory.

Summary


Thank you for considering our proposal for a more peaceful, uniform Middle East. We feel that with some hard work and good media coverage this proposed process will benefit the Western world greatly.